2. Replacing the Keyboard
In this section, we're going to implement a simple calculator that uses a normal UITextView
object as an input field. Instead of letting the users enter any sort
of text they want, we'll present an input view that contains buttons
for numbers, as well as buttons for the calculator functions.
Our calculator will use
Reverse Polish Notation (RPN). With RPN, the mathematical operators are
shown after the numbers on which they should operate. For instance, 1 +
3 would be written as 1 3 + in RPN. In a longer sequence, the result of
an operation can be used as input to the next operator. For example, 10
/ 2 + 3 would be written as 10 2 / 3 + in RPN.
One consequence of this
notation is that it eliminates the need for parentheses in expressions.
RPN expressions are always evaluated left to right. To change the order
of operations, you just need to shift the operators around. For
example, (3 * 4) + 10 becomes 3 4 * 10 + in RPM, and 3 * (4 + 10)
becomes 3 4 10 + *. When entering expressions like this in an RPN
calculator, normally you press some sort of Enter key between entering
numbers, as in 3 [Enter] 4 [Enter] 10 [+] [*].
Another consequence of
using RPN is that creating a calculator app becomes really simple! At
the core of the implementation lies a stack (in our case, an NSMutableArray
will do nicely) onto which each number is pushed. Each mathematical
operator uses the top item of the stack, along with the number
currently in the text view, to perform an operation and leave the
result in the text view. We don't need to worry about parsing
parentheses or keeping track of pending operations that are waiting for
a higher-precedence operation to take place first.
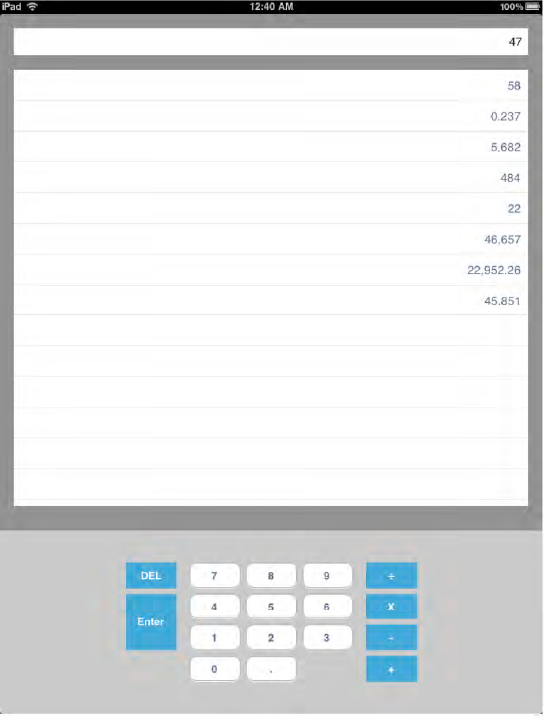
As a bonus, our app will make
use of the iPad's screen real estate to show more than just the single
number being entered. We'll show the entire stack of all numbers that
have been entered and are waiting to be acted upon, as shown in Figure 2.
In honor of this calculator's
reverse Polish heritage, we're going to name it ClacHsilop. (Read it
backward. If I have to explain it, that means it's not funny!)
Open Xcode, make a new view-based iPad project, and name it ClacHsilop.
This class will have a single view controller, which will manage the
text view and the table view in the display. For the text view, rather
than just setting a property to specify the inputView, we're going to subclass UITextView and override the inputView method, returning a pointer to a view of our own.
2.1. Defining the InputView Class
Let's start by creating the new view. We'll subclass UITextView, and use Interface Builder to define the content for our inputView, laying out buttons the way we want, and connecting them to action methods in our UITextView
subclass. Our text view class will also define a delegate protocol for
passing along calculator command actions (+, −, and so on) to its
delegate.
Use the New File Assistant to create a new Objective-C class, a subview of UIView (since UITextView isn't one of the choices), and name it InputView. The InputView class will a have a method that allows buttons in the inputView
GUI to enter text directly (in our case, strings containing numeric
digits), as well as a method that will let a button trigger a
calculator action based on the sender's tag. Here's the complete source
of the InputView class:
//  InputView.h
#import <UIKit/UIKit.h>
typedef enum ActionTag {
  ActionEnter = 0,
  ActionDivide,
  ActionMultiply,
  ActionSubtract,
  ActionAdd
} ActionTag;
@protocol InputViewDelegate;
@interface InputView : UITextView {
  UIView *inputView;
  id <InputViewDelegate> ivDelegate;
}
- (IBAction)takeInputFromTitle:(id)sender;
- (IBAction)doDelete:(id)sender;
- (IBAction)doTaggedAction:(id)sender;
@end
@protocol InputViewDelegate
- (void)doTaggedAction:(ActionTag)tag forInputView:(InputView *)iv;
@end

//  InputView.m
#import "InputView.h"
@implementation InputView
- (void)dealloc {
  [inputView release];
  [super dealloc];
}
- (UIView *)inputView {
  if (!inputView) {
    NSArray *objects = [[NSBundle mainBundle] loadNibNamed:@"RpnKeyboard" owner:self
      options:nil];
    inputView = [[objects objectAtIndex:0] retain];
  }
  return inputView;
}
- (IBAction)takeInputFromTitle:(id)sender {
  // remove the initial zero;
  if ([self.text isEqual:@"0"]) {
    self.text = @"";
  }
  self.text = [self.text stringByReplacingCharactersInRange:self.selectedRange
    withString:((UIButton *)sender).currentTitle];
}
- (IBAction)doDelete:(id)sender {
  NSRange r = self.selectedRange;
  if (r.length > 0) {
    // the user has highlighted some text, fall through to delete it
  } else {
    // there's just an insertion point
    if (r.location == 0) {
      // cursor is at the beginning, forget about it.
      return;
    } else {
      r.location -= 1;
      r.length = 1;
    }
  }
  self.text = [self.text stringByReplacingCharactersInRange:r withString:@""];
  r.length = 0;
  self.selectedRange = r;
}
- (IBAction)doTaggedAction:(id)sender {
  ActionTag tag = [sender tag];
  [ivDelegate doTaggedAction:tag forInputView:self];
}
@end
There are just a couple tricky parts here. The first is in the takeInputFromTitle:
action, which is the one that all our numeric digit buttons will call.
Like most handheld calculators, ours will display a 0 (zero) instead of
an empty display when its value is zero. The small check for a 0 in
that method makes that 0 go away when the user starts typing.
The other fussy bit is the doDelete:
action, which will be called by the delete/backspace key on the
keyboard. Since the user can always highlight a section of the number
by touching it, as well as put the insertion cursor at the beginning of
the number, we need to consider a few things there before deleting any
text.